|
|
|
|---|---|
|
COMMUNITY NEWS (Cont.) |
The Prater's Creek Gazette 14th Issue Spring 2007 Page #3 |
|
The 106th Annual 4th of July Picnic will be held on the banks of Prater’s Creek. Mayor Allen Jones promises this picnic will “be the biggest ever”. His honor told the Gazette that there would be “two types of Cole slaw and potato salad!” Mayor Jones said there would again be sack races, three legged races, and egg races throughout the day. The night will end with a fireworks show. Local Musician Gets Community Service in trial Dr. Ignatius J. Trundell, better known as Grandpa of The Drovers Old Time Medicine Show, was sentenced to 100 hours of community service after being found guilty of drunk and disorderly conduct following the Super Bowl this past February (see Spring 2007 issue). Dr. Trundell will split his community service time between picking up trash along Terrapin Crossing and Belle Shoals Road and with having to listen to Paris Hilton cry and go on endlessly about how she shouldn’t have to pick up trash. Dr. Trundell will also be playing benefit shows with his band as part of his sentence. “Well, I guess we’ll play Spitoono again this year” Dr.Trundell told the Gazette. Also the judge has ordered Dr. Trundell to give ten hours of testimonials in the county schools about the dangers of drinking and being a Chicago Bears fan. Canning Time In Caroline It's that time of year again to can your vegetables and to be making jams and preserves. Below is a step by step process for putting up canned goods. Happy Canning!
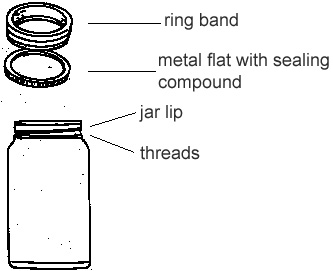
Jars used for vegetables, meats and fruits to be processed in a pressure canner do not need to be sterilized. It is also unnecessary to sterilize jars for fruits, tomatoes and pickled or fermented foods that will be processed 10 minutes or longer in a boiling-water canner. TOP IT OFF WITH THE RIGHT LID The two-piece, self-sealing lid is recommended for home canning. It consists of a flat, metal lid held in place during processing by a metal screw band. The flat lid is crimped around the bottom edge to form a trough, which is filled with a colored gasket compound. When jars are processed, the lid gasket softens and covers the jar-sealing surface, yet allows air to escape from the jar. The gasket then forms an airtight seal as the jar cools. Gaskets in unused lids work well for at least five years from their date of manufacture if stored in a cool, dry area. Older, unused lids or improperly stored lids may fail to seal. Buy only the quantity of lids you will use in a year. To ensure a good seal, carefully follow the manufacturer’s directions. Examine all metal lids carefully. Do not use old, dented or deformed lids, or lids with gaps or other defects in the sealing gasket. After filling jars with food, release air bubbles by inserting a flat, plastic spatula between the food and the jar. (Don’t use a metal spatula or knife.) Slowly turn the jar, and move the spatula up and down to allow air bubbles to escape. Adjust the headspace, and clean the jar rim (sealing surface) with a clean, damp paper towel. Uncleaned jar-sealing surfaces may cause seal failures. Place the lid, gasket down, onto the cleaned jar rim. Then fit the metal screw band over the flat lid. Follow the lid manufacturer’s guidelines for tightening the jar lids properly. Do not retighten lids after processing jars. As jars cool, the contents in the jar contract, pulling the self-sealing lid firmly against the jar to form a high vacuum. If screw bands are too loose, liquid may escape from jars during processing, and seals may fail. If screw bands are too tight, air cannot vent during the processing, and food will discolor during storage. Over-tightening may also cause lids to buckle and jars to break, especially with raw-packed, pressure-processed food. KINDS OF CANNERS There are two main types of canners for home-canning: boiling-water canners and pressure canners. Most hold seven quart jars or eight to nine pint-size jars. Small pressure canners hold four quart jars: some large pressure canners hold 18 pint-size jars in two layers, but only seven quart jars. Never use pressure saucepans with smaller volume capacities for canning. You must process low-acid foods, like vegetables, meat, poultry and fish, in a pressure canner to prevent botulism, an often fatal type of foodborne illness. Although pressure canners may also be used for processing some acid foods, such as fruits, boiling-water canners are recommended for this purpose because they are faster. Please refer to Cooperative Extension’s fact sheet “Food Canning Basics,” Bulletin #4078, for more information on safe home canning. BOILING WATER CANNERS Boiling-water canners are made of aluminum or porcelain-covered steel. They have removable, perforated racks and fitted lids. The canner must be deep enough so that at least one inch of briskly boiling water will cover the tops of jars during processing. Boiling-water canners with ridged bottoms can be used only on a gas range. Boiling-water canners with flat bottoms can be used on either a gas or electric range. To ensure uniform processing of all jars with an electric range, the canner should be no more than four inches wider than the burner (when centered over the burner, the canner will overhang the burner by two inches all the way around). Boiling-Water Canning Step-by-Step
1. Fill the canner halfway with water.
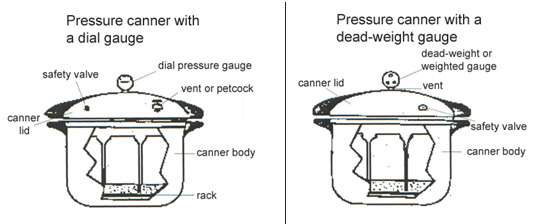
Pressure canners for use in the home have been extensively redesigned in recent years. Models made before the 1970s were heavy walled kettles with clamp-on or turn-on lids. They were fitted with a dial gauge, a vent port in the form of a petcock or counterweight, and a safety fuse. Modern pressure canners are lightweight, thin-walled kettles; most have turn-on lids. They have a jar rack, gasket, dial or weighted gauge, and automatic vent/cover lock, a vent port (steam vent) to be closed with counterweight or weighted gauge and a safety valve.
To be absolutely certain you are getting
a true reading of the temperature inside your pressure canner you must: To vent a canner, leave the vent port uncovered on newer models, or manually open petcocks (on some older models). Then, heat the filled canner with its lid locked into place until the water boils and generates steam that escapes through the petcock or vent port. When steam first escapes, set a timer for 10 minutes. After venting 10 minutes, close the petcock, or place the counterweight or weighted gauge over the vent port to pressurize the canner. Weighted-gauge models exhaust tiny amounts of air and steam each time their gauge rocks or jiggles during processing. They control pressure precisely and do not need watching during processing. The sound of the weight rocking or jiggling indicates that the canner is maintaining the recommended pressure. Weighted gauges do not have to be checked for accuracy. 3. Check dial gauges for accuracy before use each year, and replace them if they read high by more than one pound at five pounds, 10 pounds or 15 pounds of pressure. Low readings cause over-processing and also indicate that the gauge should be replaced. Gauges may be checked at most county Extension Offices. 4. Handle canner lid gaskets carefully, and clean them according to the manufacturer’s directions. Nicked or dried gaskets will allow steam leaks during pressurization of canners. Keep gaskets clean between uses. Gaskets on older-model canners may require a light coat of vegetable oil once each year. Gaskets on newer-model canners are prelubricated and do not need oiling. To find out if your canner gasket has been prelubricated, check the manual. Lid safety valves are thin metal inserts or rubber plugs that relieve excess pressure in the canner. Do not pick at or scratch valves while cleaning lids. 5. Use only canners that have the Underwriter’s Laboratory (UL) approval for safety. |
|
|
|
|
|
|
|
|
Home | About the Band | The Legend | Concert Listings | Discography | News | Gazette | General Store Photo Gallery | Grandpa-Cam | Video Clips | Press Clippings | Diamond Cuts | Contact Us | Favorite Links The Drovers Old Time Medicine Show © 2004 - 2008 All Rights Reserved Designed and Maintained by AJs Web Solutions and powered by AJs web hosting |
|

 Sterilize
jars to be used for jams, jellies and pickled products processed less than
10 minutes. Place empty jars right side up on the rack in a boiling-water
canner. Fill the canner and jars with hot (not boiling) water to one inch
above the tops of the jars. Boil 10 minutes. Remove hot, sterilized jars one
at a time and drain. Save the hot water for processing filled jars. Fill
jars with food, adjust lids, and process as directed.
Sterilize
jars to be used for jams, jellies and pickled products processed less than
10 minutes. Place empty jars right side up on the rack in a boiling-water
canner. Fill the canner and jars with hot (not boiling) water to one inch
above the tops of the jars. Boil 10 minutes. Remove hot, sterilized jars one
at a time and drain. Save the hot water for processing filled jars. Fill
jars with food, adjust lids, and process as directed.